17:57 ЧЕРТЕЖИ УЛЬЯ ВАРРЭ - Beekeeping with the Warrй hive |
| Warrй Beekeeping
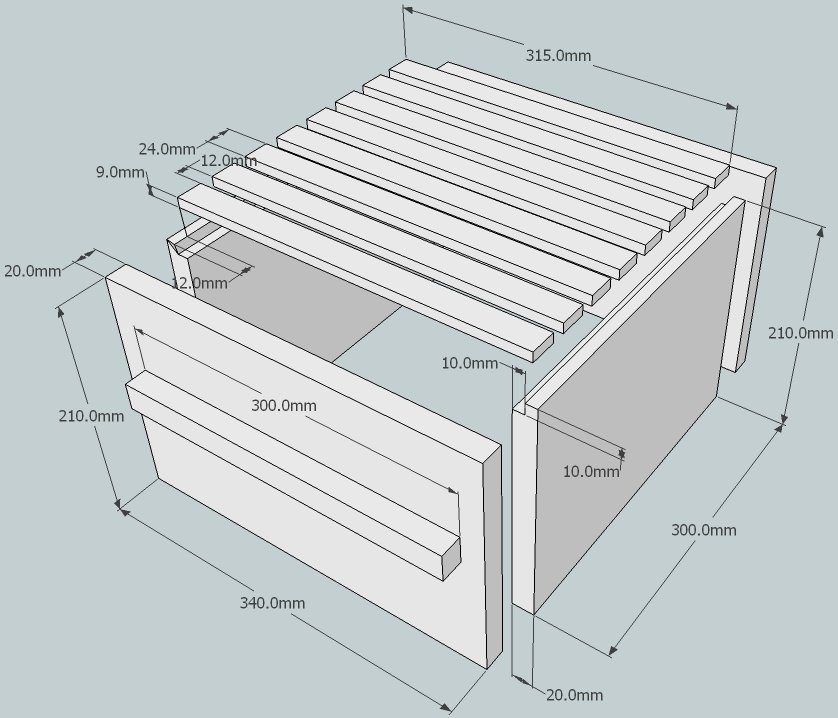
PDF metric version for printing (375kb) Plans for constructing a Warrй hive -- The People's Hive The plans shown below are based as closely as possible on those in the 12th edition of Beekeeping for All published in 1948. If you think that we have deviated in any way from those plans, we should be grateful if you would contact us to let us know. The page numbers refer to the pages in the book. At the end of this page we include plans for constructing a box with a window according to the modification of Warrй's hive introduced by Frиrиs & Guillaume. We include this variant of the box because many beekeepers, especially beginners, find it helpful for monitoring the progress of colony development. However, we warn that adding windows increases the complexity and expense, not to mention the consumption of resources. The plans shown here are based on boxes of 20 mm thick wood, the minimum that Warrй regarded as sufficient (p. 52). However, he recommended 24 mm for improved rigidity. Thicknesses of 38 and 50 mm have also been used in colder climates. Any change to the box wall thickness should ideally retain the internal measurements of 300 x 300 x 210 mm and will thus require all other components of the hive apart from the legs to be re-sized. Imperial measurements The plans shown here are all in metric measurements. However, a set in metric and imperial measurements (tenths of an inch) has been prepared by Nick Hampshire, Martin Kapp Kaiser and Bernhard Heuvel (2008). They are easier to follow than those in Warrй's book and have served well for a while. But they show some departures from Warrй's specification as follows:
Imperial plans that eliminate these discrepancies can be downloaded here. The hive
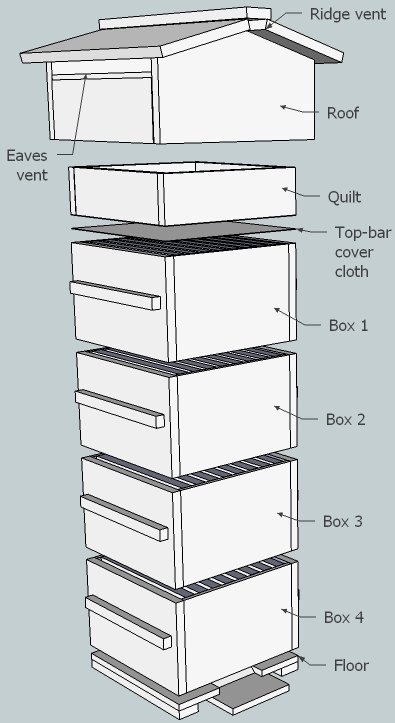
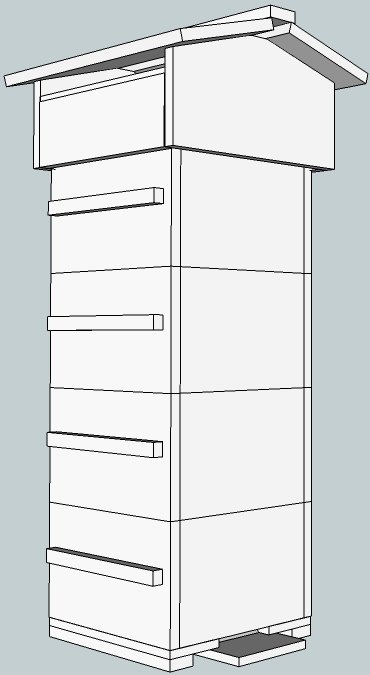
N.B. There is no direct passage of air from the top box to the vents under the roof. The quilt is filled with a suitable insulating material of plant origin such as chopped straw, wood shavings, dried leaves etc. As well as a top-bar cover cloth there is a cloth fixed to the bottom of the quilt to retain its contents. A suitable material for these cloths is hessian sacking (burlap). The boxes
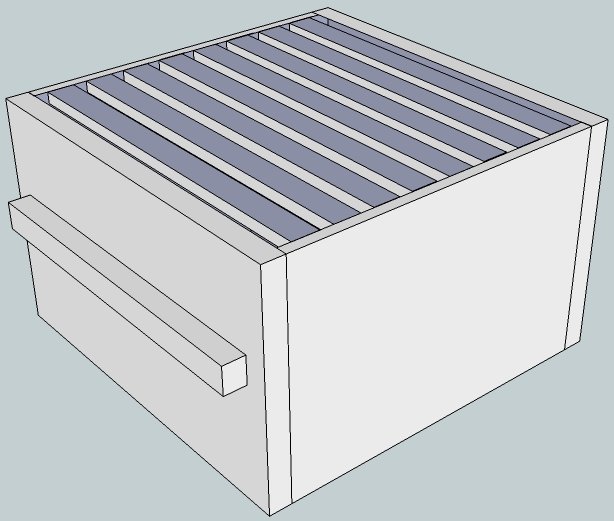
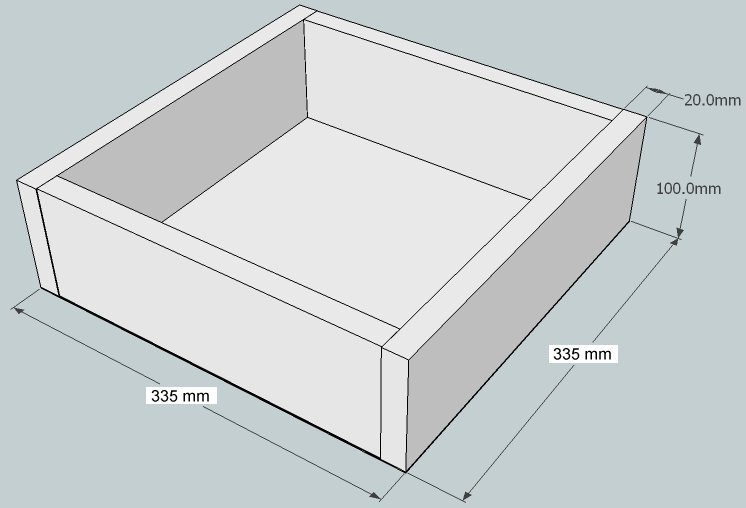
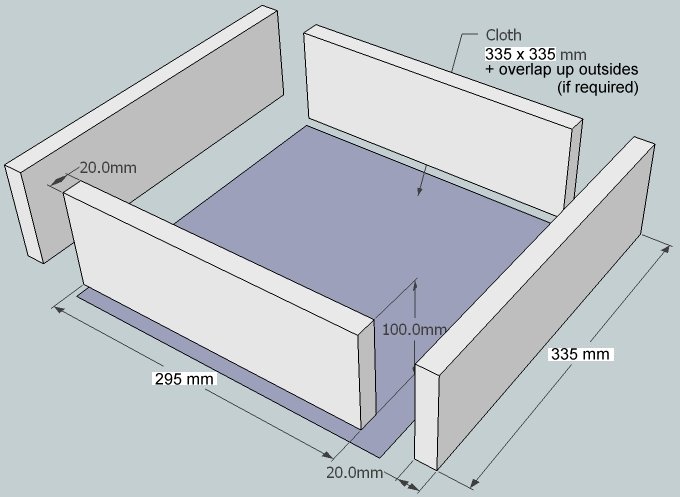
The basic box is butt-jointed at the corners. Nailing with seven galvanised nails 65 x 2.65 mm makes a strong joint. Glue is unnecessary. Obviously half-joints or finger joints make a stronger box, although this increases the complexity. Warrй does not specify the size of the handles, but 300 x 20 x 20 mm bars, with three nails and glued have been found to work well in practice, including when lifting the entire hive with the bottom box handles. The upper edge of the bars may be sloped to shed rainwater.
The spacing between all bars and between the end bars and the walls is 12 mm. The rebates can be cut with a table saw, a rebating plane or even with a hand saw provided that a guide is affixed to the wood first. Warrй specifies a top-bar length of 315 mm. If it is extended close to 320 mm, then it better spans the rebate and leaves no cavity for pests to occupy. The quilt
The thickness of the walls of the quilt could be as little as 10 mm as it supports only the roof. The authentic Warrй quilt is 5 mm smaller than the boxes 'to facilitate working'. This allows the quilt contents retaining cloth to be brought up outside the quilt box, and fixed there without compromising the 10 mm clearance all round inside the roof.
The roof
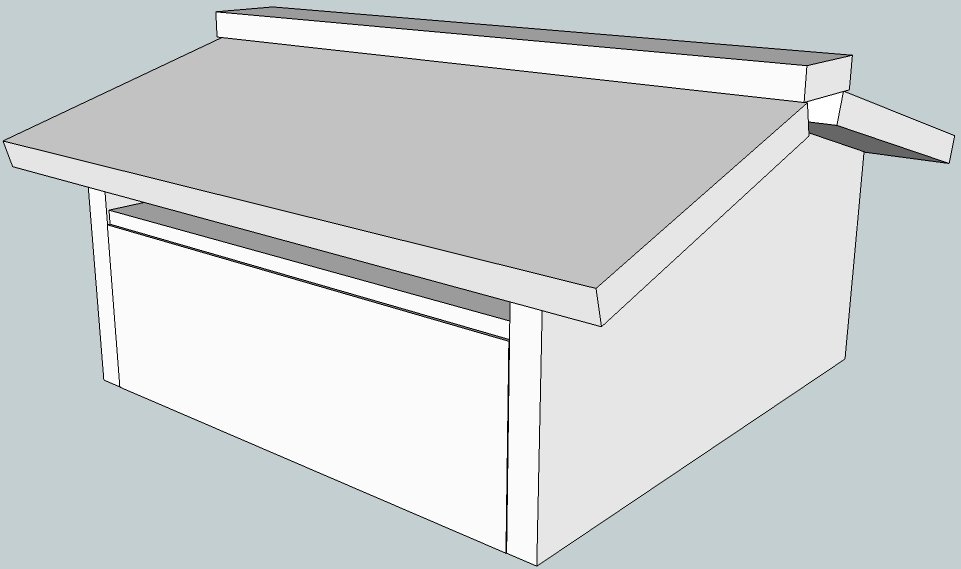
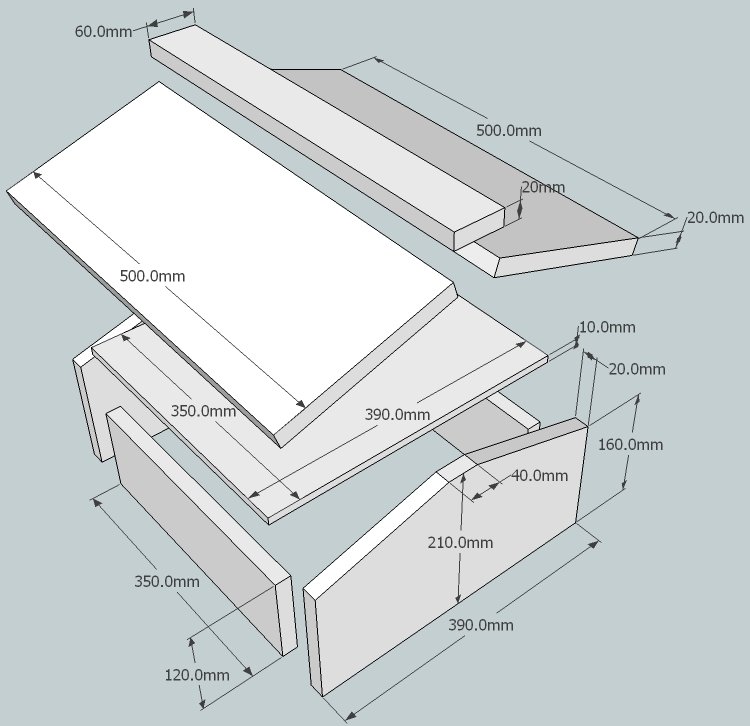
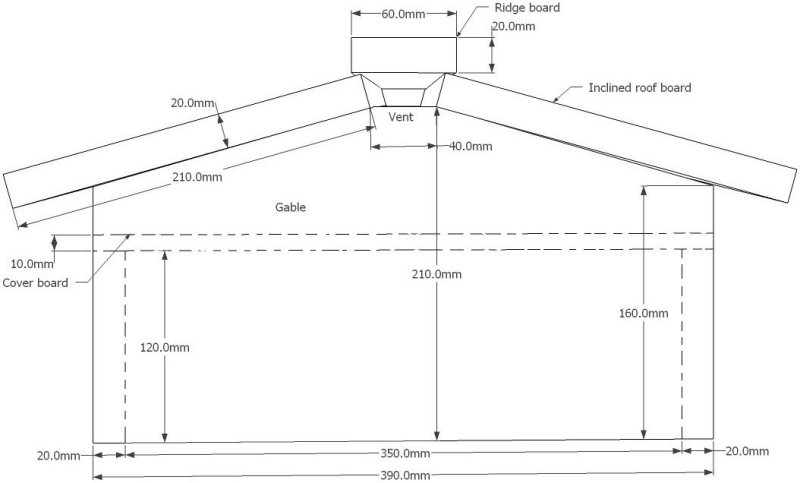
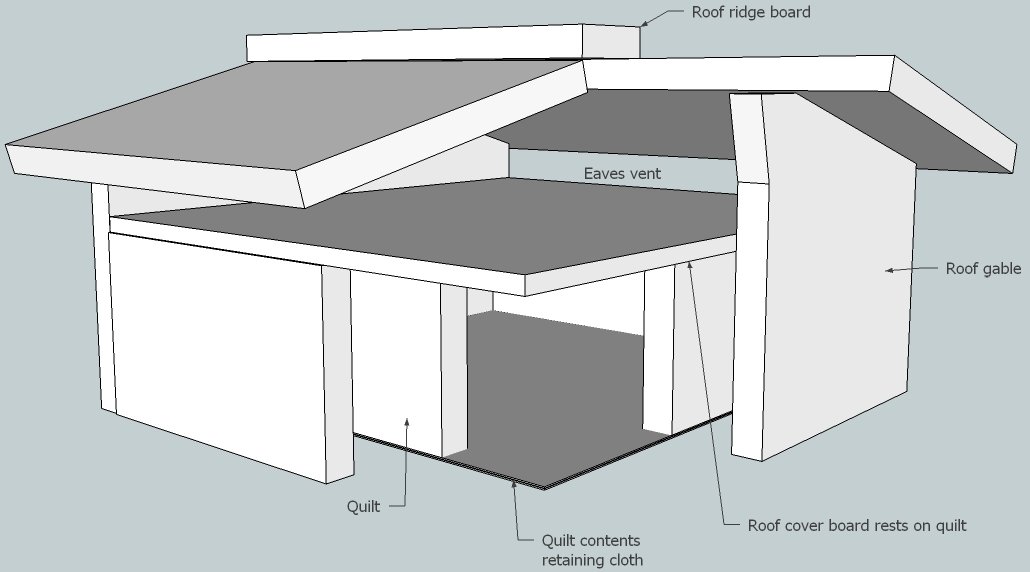
This is the more complicated of the two roof designs that Warrй presents in Beekeeping for All. It has a ventilated cavity immediately under the upper surfaces of the roof. This is to dissipate solar heat. Inside is a cover board (or 'mouse board') which rests on the quilt. Thus there is no communication from the quilt to the ventilated roof cavity. The example given here uses 20 mm wood for the outer structure. This is based on Warrй's plans. Wood of 15 mm thickness would be perfectly adequate and make for a lighter roof. There is 10 mm play between the roof inner walls and the quilt outer walls to ease placement and removal. If thinner wood is used for the inclined boards, they may be nailed to the ridge board from their undersides by supporting the three pieces inverted with blocks suitably positioned to give approximately the correct angle. The unit of three boards is then nailed on to the gables.
The following drawing shows a cut-away view of the quilt in the roof. Note that the lower rim of the roof projects below the junction in which reside the top-bar cloth and the cloth fixed to the bottom of the quilt. This avoids wicking of moisture into that joint.
The floor
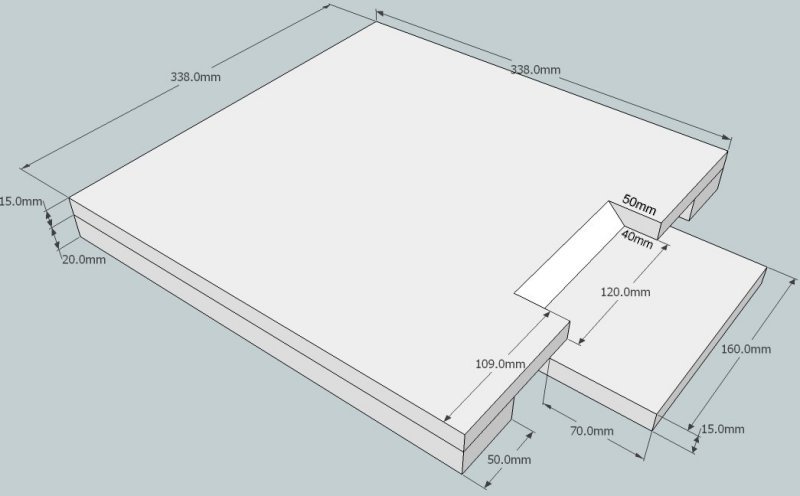
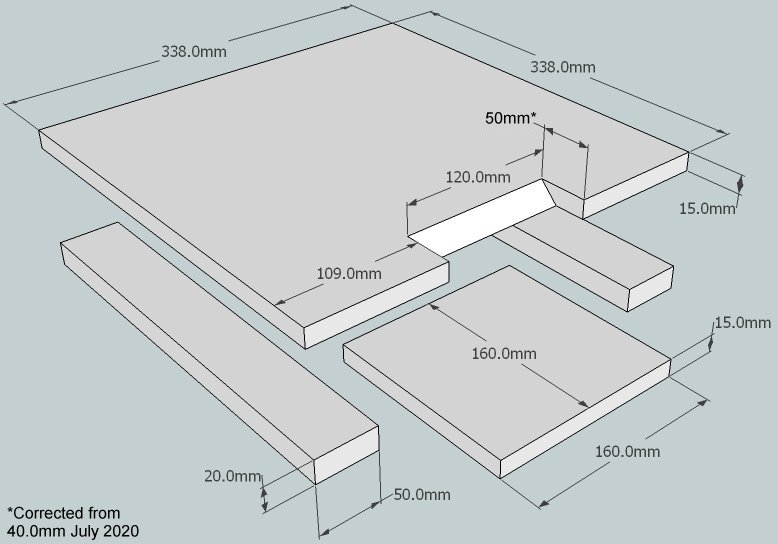
Warrй recommended 15-20 mm for the thickness of the floor. He gave no guidance on the thickness of the battens underneath it. The notch in the floor serves as the entrance and is 40 mm deep for hive walls of 20 mm thickness. If required, the 160 mm wide alighting board can extend right to the back of the floor to give the latter added rigidity. Note that the floor is 2 mm narrower in both horizontal directions compared with a box. Warrй suggested allowing 1 mm all round to promote drainage of rainwater.
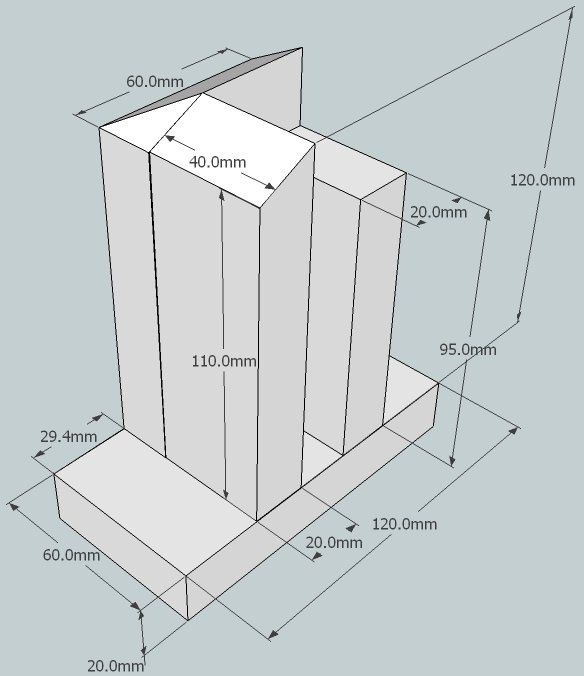
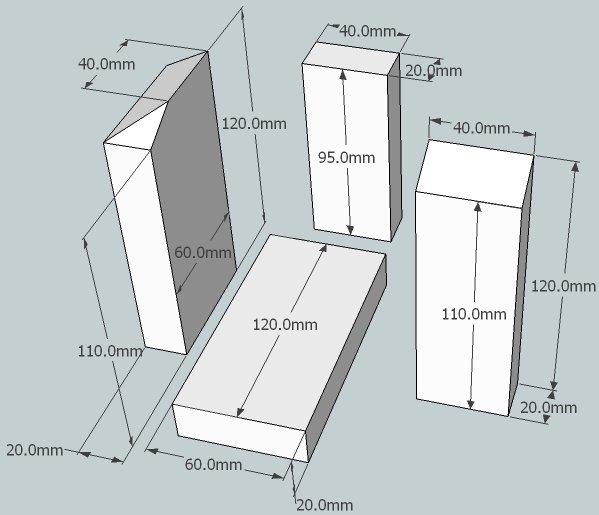
The leg
The leg has a wide foot attached to prevent the hive from sinking into the ground and possibly toppling. Furthermore it gives a 20-30 mm projection outside the footprint of the floor, thus greatly increasing stability. The leg places the hive entrance relatively close to the ground compared with beekeeping practice in general. However, Warrй regarded a low entrance as important, as can be seen on pages 46-48. In the above drawing, the right hand pillar of the leg has the underside of the floor resting on it. The angled left hand pillar is nailed from both sides to the side of the floor with a total of four nails. The difference in height of the right and left pillars is 25 mm which will work for the floor corner overall thickness of 35 mm shown above. If the floor corner is less than 25 mm thick, then the right pillar should be lengthened accordingly. The feet may be arranged in a pinwheel (Catherine-wheel) arrangement or constructed as two mirror symmetrical pairs and placed in mirror symmetry accordingly.
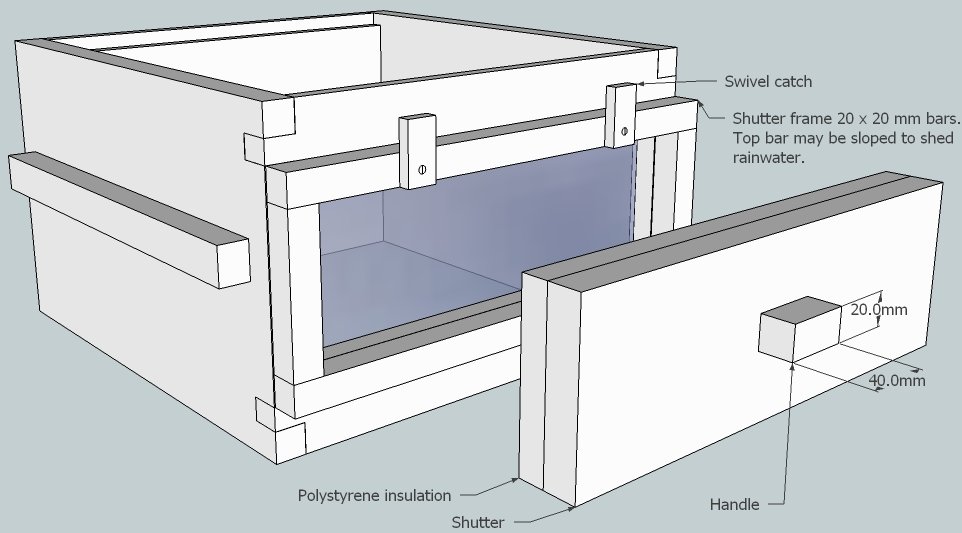
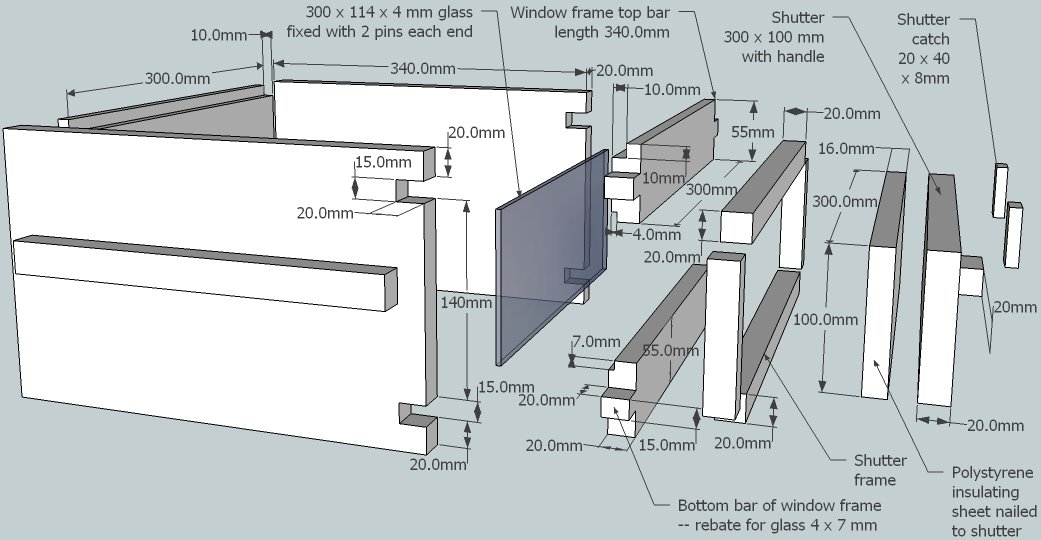
Box with window Based on the design of Frиrиs & Guillaume.
This design places the insulation flush against the glass, the depth of the cavity exactly matching the depth of the shutter. To minimise jamming of the shutter in wet conditions, it may be made one or two millimetres smaller in each direction. In this version, the window frame bars are jointed to the box walls with mortise and tenon joints. Alternatively, butt joints with three nails at each joint should give satisfactory service.
PDF metric version for printing (375kb Источник: Beekeeping with the Warrй hive -- Plans for constructing a Warrй hive |
|
|
| Всего комментариев: 0 | |
Поиск
Категории раздела
|
ДОМ [10]
..сырой материал..
|
| Соломенные БЛОКИ [0] |
|
uCoz [10]
..инфа, тонкости, хитрости..
|
| ГЛИНА [0] |
| ДРЕВЕСИНА [0] |
| КАРКАС [0] |
| ФУНДАМЕНТ [0] |
| ИНСТРУМЕНТ, ОСНАСТКА [0] |
| СТРОИТЕЛЬНЫЕ ТЕХНОЛОГИИ [12] |
| ЗАКОНОДАТЕЛЬСТВО [1] |
| "ЛИРИКА" [0] |
| Дом - ССЫЛКИ [3] |
| ЛЮДИ [3] |
|
ПОСЕЛЕНИЯ [6]
..информация к размышлению.....
|
|
ПЧЕЛОВОДСТВО [8]
..сырая инфа из разных источников..
|
| ПОЛИТСОЦИО [0] |
| ПЕРМАКУЛЬТУРА [11] |
|
РАЗГРЕСТИ [16]
..разное - требуте добавления категорий..
|
| РЕМОНТ всего [7] |
| ВОПРОСЫ [0] |
|
ОБОРУДОВАНИЕ, КОММУНИКАЦИИ [3]
..электрика, сантехника и т.д..
|
|
ЕДА [3]
..еда, заготовки, хранение..
|
| JOOMLA! [14] |
